Checkr Web SDK (v1)
Checkr Embeds are the fastest way to add background check experiences to a product using pre-built components that you can add with a few lines of code. Our goal is to make it easy to build an end-to-end background check experience within your product, which will be automatically updated with new Checkr releases. Checkr embeds are fully themeable.
Checkr embeds are built using the Checkr WebSDK library, and can be added to your application using JavaScript or React (>= v16 and <= v18). Embeds are supported by Microsoft Edge, Chrome, and Firefox versions released on or after 2019.
Checkr embeds may be used by both developers building directly to the Checkr API, and by partner developers building partner applications.
Pre-requisites
- You already have an account with Checkr.
- Except for Sign-up & Connect embed: You have implemented Checkr OAuth if you are a partner.
To use a Checkr embed within your application
- Load Checkr's Web SDK directly through CDN. This ensures you always have the latest version.
- Add the embed to your frontend code.
- Except for Sign-up & Connect embed: Implement authentication for the embed using a SessionToken.
- Optionally, customize the embed based on your application's needs.
First, Load Checkr’s Web SDK using CDN
<script src="https://cdn.jsdelivr.net/npm/@checkr/web-sdk/dist/web-sdk.umd.js"></script>The Examples section below showcases some examples.
For Sign-up & Connect embed no previous authentication is required. In fact, Sign-up & Connect embed will implement most of the Checkr OAuth flow for you. It provides your application with an Oauth Authorization Code to exchange for an OAuth access token, which can be used by your application to make API calls to Checkr on behalf of your customers.
This Access Token must be used to request SessionTokens for authentication using other embeds.
Notes on keeping your Access Token secure
Be aware that the following token exchanges must take place within your own backend application to avoid exposing Access Tokens in your frontend application, which are considered sensitive secrets:
- Exchange of the Oauth Authorization Code for an Access Token
- Exchange of the Access Token for a Session Token (specific to use with embeds.)
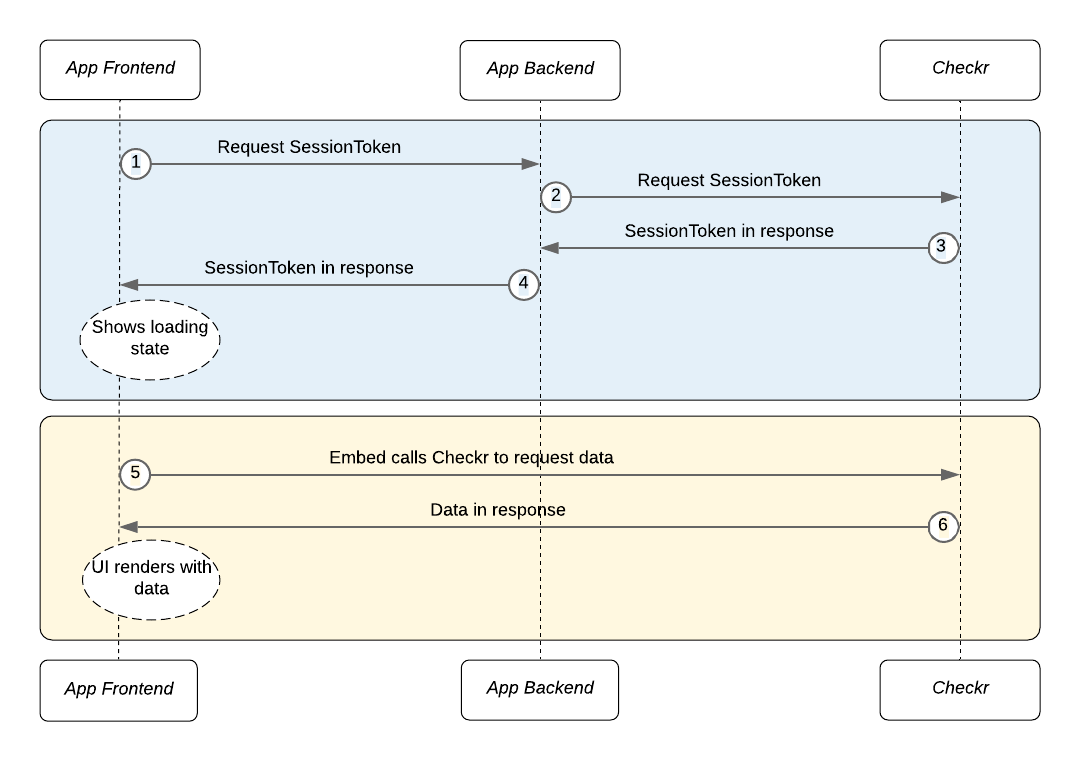
First, the embed authenticates with Checkr.
- The embed sends a request from your application's frontend to your application's backend for a Checkr SessionToken.
- Your application’s backend must first authenticate the logged in user using its own mechanisms, and then pass the request to Checkr.
- Checkr sends a SessionToken to your backend in response.
- Your application’s backend then passes the SessionToken to the embed running on your application's frontend.
While authentication is processing, the embed displays a loading state in your app. Then, the embed fetches and renders the returned data.
- The embed uses Checkr APIs to request data.
- Checkr APIs return the requested data directly to the embed.
When the requested data is returned, the embed renders within your application.
Embed authentication flow
When an Embed loads for the first time, it sends an HTTP POST request to your backend, requesting a SessionToken. Use the sessionTokenPath property to set your application's backend endpoint to use.
By default, your application's cookies are sent to your backend to help you authenticate the user. To enable authentication via headers (such as bearer tokens), use the sessionTokenRequestHeaders property as shown below.
Note: sessionTokenPath is a path to request the token, not the token itself. You should not be passing the token as a prop directly to the embed.
const embed = new Checkr.Embeds.NewInvitation({ sessionTokenPath: '/your-backend/session-tokens', sessionTokenRequestHeaders: () => ({ Authorization : `Bearer ${token}` })})<NewInvitation sessionTokenPath='/your-backend/checkr-session-tokens' sessionTokenRequestHeaders={() => ({ Authorization : `Bearer ${token}` })}/>sessionTokenPath property. Be certain to complete your application's user authentication and authorization before responding to the request.
Run your application's user authentication and authorization rules before requesting Checkr to acquire a SessionToken.
Step 1: The embed requests a SessionToken from your backend
The embed will use the sessionTokenPath property to request a SessionToken from your backend.
const embed = new Checkr.Embeds.NewInvitation({ sessionTokenPath: '/your-backend/session-tokens' })<NewInvitation sessionTokenPath='/your-backend/checkr-session-tokens' />Step 2: Send a request for a SessionToken from your backend to Checkr
Checkr provides two means to acquire this SessionToken: one for our direct customers, and one for our partner developers.
Customers building directly to the Checkr APIs: Use the API Keys found in the Checkr Dashboard to request SessionTokens.
Partner developers, building partner applications: Use the OAuth Access Token acquired through Checkr OAuth to request SessionTokens. This is a pre-requisite for using Embeds. See the Checkr Partner Guides for more information.
When your application’s backend receives the HTTP Post request from the embed, run authentication and authorization rules based on your application logic (for the current user), and then make the following call to Checkr.
Scopes are used to determine what access you are requesting for.
| Scope | Use case |
|---|---|
| order | NewInvitation Embed, ReportsOverview Embed |
| disclosure | Disclosure & Consent Embed |
POST {checkr-api-host}/web_sdk/session_tokens
Checkr API host:
- Staging: https://api.checkr-staging.com/v1
- Production: https://api.checkr.com/v1
Use the following as the request JSON payload:
curl --request POST \
  --url {checkr-api-host}/web_sdk/session_tokens \
  --user your-checkr-oauth-access-token: \
  --header 'Content-Type: application/json' \
  --data '{
    "scopes": ["order"]
}'
curl --request POST \
  --url {checkr-api-host}/web_sdk/session_tokens \
  --user your-checkr-api-key: \
  --header 'Content-Type: application/json' \
  --data '{
    "scopes": ["order"],
    "direct": true
}'
Step 3: Checkr responds to your backend with a SessionToken
Checkr will respond with a SessionToken.
{
  "token": "example-session-token"
}
Step 4: Return the acquired SessionToken from your backend to your frontend
Return the JSON response (from above) from the Checkr API back to your frontend.
SessionTokens are short-lived. If they expire, the embed will automatically attempt to renew them by re-executing Steps 2 to 4.
Fake mode lets you play with the Embed without it making any API calls. When fakeMode is enabled in an embed (all embeds support it), the embed would work using canned data.
const embed = new Checkr.Embeds.NewInvitation({ fakeMode: true })<NewInvitation fakeMode={true} />If you want to test with a Checkr Staging account, you can pass an additional param to any embed, env: "staging" to run the embeds against Staging. You can omit the env param entirely, or specify env: "production", to use a production account.
Note: Embeds do not support mixed Staging and Production usage on the same page - ensure all concurrently rendered embeds are using the same environment.
const embed = new Checkr.Embeds.SignUpFlow({
  env: 'staging'
  oauthTokenPath: '/your-backend/checkr-staging-oauth-token',
  partner: { id: 'abcdef1', name: 'Enterprise Partner Staging' },
});<SignUpFlow
env='staging'
oauthTokenPath='/your-backend/checkr-staging-oauth-token'
partner={{ id: 'abcdef1', name: 'Enterprise Partner Staging' }}
/>While Embeds do not rely on Webhooks, you can definitely use it in combination with Embeds to build more advanced features such as workflow automation in your product.
Use the Sign-up & Connect embed to connect an existing Checkr account from an external application to Checkr and also create a Checkr account if needed.
This is the flow for Sign-up & Connect embed:
- Initial screen
- Select "Already have an account? Sign in"
- Login to your Checkr account
- Get a code for your application backend to retrieve an access token.
- Back to your application
- Fill in user information and click "Get started"
- Get business information for Checkr account creation. Here is the business data required:
- Business Name
- DBA name (optional)
- Business Address (Street, City, State, Zip)
- US Tax ID (Must match the city associated with the Business Address)
- Credit Card information required for payment:
- Cardholder Name
- Card Number
- Expiration Date
- Security Code
- Zip Code
- Get a code for your application backend to retrieve an access token
- Back to your application
- Get business information for Checkr account creation. Here is the business data required:
- Select "Already have an account? Sign in"
Note that Sign-up & Connect Embed doesn’t handle customer account credentialing step.
The Sign-up & Connect embed may be added to your page either inline or as a modal. Adding the embed inline will render the embed on your application's page. Adding it as a modal allows you to launch the embed from a button or other feature on your page.
Add the embed inline
Both JavaScript and React may be used to insert the Embed inline in your application.
const embed = new Checkr.Embeds.SignUpFlow({ oauthTokenPath='/your-backend/checkr-oauth-token', partner: { id: 'abcdef1', name: 'Enterprise Partner' } })
embed.render('#your-placeholder-div')<SignUpFlow oauthTokenPath='/your-backend/checkr-oauth-token' partner={ id: 'abcdef1', name: 'Enterprise Partner' }/>Add the embed as a modal
Use JavaScript to launch the Embed as a modal, for example on the click of a button in your application.
const btn = document.getElementById('your-button')

btn.addEventListener('click', event => {
  const embed = new Checkr.Embeds.SignUpFlow({ oauthTokenPath='/your-backend/checkr-oauth-token', partner: { id: 'abcdef1', name: 'Enterprise Partner' } })
  embed.modal()
})The default modal width is 600px on desktops and 100% on mobile devices. Use width option to change the desktop width.
embed.modal({ width: '700px' })Frontend Examples
const embed = new Checkr.Embeds.SignUpFlow({ oauthTokenPath='/your-backend/checkr-oauth-token', partner: { id: 'abcdef1', name: 'Enterprise Partner' } })Backend Requirement: endpoint to accept Oauth Authorization Code
You will need to implement a backend endpoint to accept the Oauth Authorization Code obtained upon completion of the signup flow.
The Embed utilizes the oauthTokenPath property to send the Oauth Authorization Code to your backend where it should be exchanged for an Access Token. This token is used to request a session token which can be used in other embeds.
The partner is required to possess both the client_id and client_secret, which can be located within the partner application data. This information is readily accessible for review via the Checkr dashboard and should live on your backend.
Example
An example implementation of the backend call in javascript would be:
import axios from "axios";

async function createOauthToken(body) {
  try {
    const response = await axios({
      method: "POST",
      url: `https://api.checkr.com/oauth/tokens`,
      headers: {
        "Content-Type": "application/x-www-form-urlencoded",
      },
      data: body,
    });

    return response.data;
  } catch (error) {
    throw error.response.errors;
  }
}

async function getOauthToken(req, context) {
  const { code } = await req.json();

  const body = {
    grant_type: "authorization_code",
    client_id: "<your_partner_app_client_id>",
    client_secret: "<your_partner_app_client_secret>",
    code: code,
  };

  const { access_token } = await createOauthToken(body);
  //Decide where & how you want save the oauth token
  await saveToken(access_token);

  res.status(200).json({ message: 'Token created successfully' });
}
The steps:
- Use code to call the ‘/oauth/tokens’ Checkr endpoint
- Save oauth token in your database or other secured storage for later use
The Sign-up & Connect embed provides the following options to customize its default behavior.
Add preset values for Account Creation step
Use preset to specify a fixed value for an available input value. Preset inputs are displayed on the embed and it is available for users to edit it.
Checkr provides 9 preset values for the Sign-up & Connect Embed:
- presetFirstName
- presetLastName
- presetEmail
- presetBusinessName
- presetAddress
- presetCity
- presetState
- presetZipcode
- presetUSTaxID
const embed = new Checkr.Embeds.SignUpFlow({
  oauthTokenPath:'/your-backend/checkr-oauth-token',
  partner:{id: 'abcdef1', name: 'Enterprise Partner'},
  presetName: 'John',
  presetLastName: 'Doe',
  presetEmail: 'johndoe@test.com',
  presetCity: 'San Francisco',
  presetTaxId: '123-45-6789',
  presetZipCode: '94103',
  presetBusinessName: 'Test Company',
  presetBusinessAddress: '123 Main St',
  presetState: 'CA',
  presetTaxId: '123-45-6789',
})<SignUpFlow
oauthTokenPath='/your-backend/checkr-oauth-token'
partner={{id: 'abcdef1', name: 'Enterprise Partner'}}
presetName='John'
presetLastName='Doe'
presetEmail='johndoe@test.com'
presetCity='San Francisco'
presetTaxId='123-45-6789'
presetZipCode='94103'
presetBusinessName='Test Company'
presetBusinessAddress='123 Main St'
presetState='CA'
presetTaxId='123-45-6789'
/>Use the Disclosure & Consent embed to include the required disclosures in your application process. These are the disclosures that candidates must read, understand and agree to before you can order a background check. The Disclosure & Consent embed works only for United States (US) screenings.
The following data is captured from the user of this Embed:
- The candidate's consent to create a background check
- The date and time when the candidate submitted their e-signature for consent
- The candidate's IP address
You can add the Disclosure & Consent embed to your page either inline or as a modal. Adding the embed inline renders the embed on your application's page. Adding it as a modal allows you to launch the embed from a button or other feature on your page. The embed initializes with some required and optional parameters
| Parameter | Description | Required |
|---|---|---|
| accountName | Your organization name | Yes |
| candidateFullName | Candidate has to type their complete name to complete an electronic signature | Yes |
| candidateId | Candidate Id for whom background check will be created | Yes |
| packageSlug | Package slug for which background check will be created | Yes |
| sessionTokenPath | Your application's backend endpoint to get the Checkr session token | Yes |
| workLocationState | Work location state | Yes |
| workLocationCity | Work location city | No |
| zipCode | Candidate ZIP code | No |
| driverLicenseState | Driver license state | Only if package has MVR |
Add the embed inline
You can use both JavaScript and React to insert the Embed inline in your application. The results shown below are examples of the Embed's default appearance.
const embed = new Checkr.Embeds.DisclosureConsent({
    accountName='Your Company Name'
    candidateFullName='Kobe Bryant'
    candidateId='4c262214ab5daabbd1a6basc'
    language='en'
    packageSlug='basic'
    sessionTokenPath='/your-backend/checkr-session-tokens'
    workLocationState='CA'
    workLocationCity='San Francisco'
    zipCode='94001'
});
embed.render('#your-placeholder-div')
import {Embeds} from '@checkr/web-sdk'
const DisclosureConsent = Embeds.DisclosureConsent.useReact(React, ReactDOM)
return (
<DisclosureConsent
accountName='Your Company Name'
candidateFullName='Kobe Bryant'
candidateId='4c262214ab5daabbd1a6basc'
language='en'
packageSlug='basic'
sessionTokenPath='/your-backend/checkr-session-tokens'
workLocationState='CA'
workLocationCity='San Francisco'
zipCode='94001'
/>
)Add the embed as a modal
Use JavaScript to launch the Embed as a modal triggered by a user-interface element.
const btn = document.getElementById('your-button')

btn.addEventListener('click', event => {
  const embed = new Checkr.Embeds.DisclosureConsent({
    accountName='Your Company Name'
    candidateFullName='Kobe Bryant'
    candidateId='4c262214ab5daabbd1a6basc'
    language='en'
    packageSlug='basic'
    sessionTokenPath='/your-backend/checkr-session-tokens'
    workLocationState='CA'
    workLocationCity='San Francisco'
    zipCode='94001'
  });
  embed.modal()
});Add SessionToken based on the authentication section above.
const embed = new Checkr.Embeds.DisclosureConsent({ sessionTokenPath: '/your-backend/checkr-session-tokens' })<DisclosureConsent sessionTokenPath='/your-backend/checkr-session-tokens' />Request callbacks trigger when the loading of the disclosure fails, or when a candidate's submitted consent is either successful or unsuccessful.
onLoadDisclosureError
onLoadDisclosureError triggers when the disclosure fails to load. This could because of an invalid input to the embed or errors from the Checkr API. The error messages pass as the callback data. The embed UI shows a generic error message which can be customized using the embed input property clientSideErrorMessage and serverSideErrorMessage.
const handleOnLoadDisclosureError = (response) => { console.log(response) }
const embed = new Checkr.Embeds.DisclosureConsent({onLoadDisclosureError: handleOnLoadDisclosureError})
const handleOnLoadDisclosureError = (response) => { console.log(response) }
<DisclosureConsent onLoadDisclosureError={handleOnLoadDisclosureError}/>{
"errors": {
"base": [
"BasePackage not found"
]
}
}onConsentSubmitError
onConsentSubmitError triggers when the submission of the candidate's consent fails. The reasons for the failure pass as the callback data. The embed UI shows a generic error message which can be customized using the prop clientSideErrorMessage and serverSideErrorMessage.
const handleOnConsentSubmitError = (response) => { console.log(response) }
const embed = new Checkr.Embeds.DisclosureConsent({onConsentSubmitError: handleOnConsentSubmitError})
const handleOnConsentSubmitError = (response) => { console.log(response) }
<DisclosureConsent onConsentSubmitError={handleOnConsentSubmitError}/>{
"errors": {
"base": [
"Invalid package_slug"
]
}
}onConsentSubmitSuccess
onConsentSubmitSuccess triggers when the candidate's consent submits successfully. The embed UI shows a generic success message which can be customized using the embed input property successMessage.
const handleOnConsentSubmitSuccess = (response) => { console.log(response) }
const embed = new Checkr.Embeds.DisclosureSubmit({onConsentSubmitSuccess: handleOnConsentSubmitSuccess})
const handleOnConsentSubmitSuccess = (response) => { console.log(response) }
<DisclosureConsent onConsentSubmitSuccess={handleOnConsentSubmitSuccess}/>'Candidate consent is recorded'The Disclosure & Consent embed provides the following option to customize its default behavior.
Checkr allows you to customize the embed's title, label and message texts shown on the UI. The parameters are below.
| Parameter | Description | Default value |
|---|---|---|
| clientSideErrorMessage | Error message shown on embed if any UI or backend validation fails | There was an issue with the provided information. Contact {{accountName}} to check the details |
| consentSubmitSuccessMessage | Message shown on embed upon successful submission of candidate consent | You have completed the disclosure & consent section |
| embedTitle | Title of the embed | Disclosure & Consent |
| nextButtonLabel | Next button label | Continue > |
| language | Supported languages are en (English) & es (Spanish) |
en |
| previousButtonLabel | Previous button label | < Previous |
| serverSideErrorMessage | Error message shown on embed for any server side errors | A system error occured. We have been notified and will resolve it as soon as possible. |
| submitButtonLabel | Submit button label | Submit |
const embed = new Checkr.Embeds.DisclosureConsent({
    embedTitle: 'This is embed title',
    nextButtonLabel: 'Next button label',
    previousButtonLabel: 'Previous button label',
    submitButtonLabel: 'Submit button label'
});<DisclosureConsent
embedTitle='This is embed title'
nextButtonLabel='Next button label'
previousButtonLabel='Previous button label'
submitButtonLabel='Submit button label'
/>Use standard CSS to customize the look and feel of your embeds.
Adjust the width on the page
By default, Embeds render using the full width of their container div. Adjust the width of the container div on your page to control the width of the embed.
Customize the theme
Embeds include a default theme, and allow users to both customize this default theme or build a custom theme.
- To customize the default theme, specify the styles you wish to override.
- To build a custom theme, use the
useBaselineoption.
CSS can target classes below
| Embed CSS selectors | Loading CSS selectors | ||
|---|---|---|---|
| .btn-primary | .checkbox-container | .checkr-embeds-loading-container | .rect4 |
| .btn-secondary | .disclosure-consent | .loading-bar | .rect5 |
| .card | .form-control | .rect1 | |
| .card-header | .form-control-label | .rect2 | |
| .card-block | .scrollable | .rect3 |
Edit the default theme
To edit the default theme, specify new values for any of the default CSS selectors listed above.
const styles = {
  '.btn-primary': {
    'background': '#0a8080',
  },
  '.card-block': {
    'background': '#F3FAFB',
  },
  '.card-header': {
    'background': '#0a8080',
    'font-style': 'italic',
    'color': 'white'
  },
  '.checkbox-container': {
    'font-style': 'italic',
    'font-weight': 'bold',
  }
};

const embed = new Checkr.Embeds.DisclosureConsent({
    styles: styles
});
Define a custom theme
To define a custom theme, set useBaseline to true, then specify values for any of the selectors listed below. If values are not set for a selector, the embed renders without styles for that value.
const styles = {
  useBaseline: true,
  '.btn-primary': {
    'background': '#002853',
    'color': 'white',
  },
  '.btn-secondary': {
    'background': '#D3D3D3',
    'color': 'black',
  },
};

const embed = new Checkr.Embeds.DisclosureConsent({
  styles: styles
})Use the NewInvitation embed to invite candidates to the Checkr-Hosted Apply Flow.
The following data is captured from the user of this Embed:
- Checkr allows businesses to model their organization as a tree of nodes. A node selector is shown if the account is configured with more than one node.
- The employment work location. Work location defines where your candidate will be employed.
- The package to be used for the background check. Packages are a list of screenings to be run for a report.
- The email address used to invite the candidate to the background check.
- Optionally, for US-based candidates, a phone number to which the invitation will also be sent.
The NewInvitation embed may be added to your page either inline or as a modal. Adding the embed inline will render the embed on your application's page. Adding it as a modal allows you to launch the embed from a button or other feature on your page.
Add the embed inline
Both JavaScript and React may be used to insert the Embed inline in your application. The results shown below are examples of the Embed's default appearance.
const embed = new Checkr.Embeds.NewInvitation()
embed.render('#your-placeholder-div')
import {Embeds} from '@checkr/web-sdk'
const NewInvitation = Embeds.NewInvitation.useReact(React, ReactDOM)
return <NewInvitation />Add the embed as a modal
Use JavaScript to launch the Embed as a modal, for example on the click of a button in your application.
const btn = document.getElementById('your-button')

btn.addEventListener('click', event => {
  const embed = new Checkr.Embeds.NewInvitation()
  embed.modal()
})The default modal width is 600px on desktops and 100% on mobile devices. Use width option to change the desktop width.
embed.modal({ width: '700px' })Add SessionToken based on the authentication section above. For example:
const embed = new Checkr.Embeds.NewInvitation({ sessionTokenPath: '/your-backend/session-tokens' })<NewInvitation sessionTokenPath='/your-backend/checkr-session-tokens' />Request callbacks are triggered when sending an invitation to a candidate is successful or fails.
onInvitationSuccess
onInvitationSuccess is triggered when an invitation is successfully sent to a candidate. Use this callback to capture details like the Checkr Invitation or Candidate id in your system.
const handleOnInvitationSuccess = (response) => { console.log(response) }
const embed = new Checkr.Embeds.NewInvitation({onInvitationSuccess: handleOnInvitationSuccess})
const handleOnInvitationSuccess = (response) => { console.log(response) }
<NewInvitation onInvitationSuccess={handleOnInvitationSuccess}/>{
"candidate_id": "00f3d4c23b83e2b845ffd991",
"candidate_url": "https://dashboard.checkr.com/candidates/00f3d4c23b83e2b845ffd991",
"created_at": "2021-09-28T03:41:30.722Z",
"custom_external_status": {
"code": "invitation_created",
"message": "Invitation Sent",
},
"external_background_check_id": null,
"external_candidate_id": "external_id",
"external_job_application_id": null,
"external_requester_id": null,
"external_system": "web-sdk",
"id": "bd6b0537212189fd6a4fa2db",
"invitation": {
"created_at": "2021-09-28T03:41:30.722Z",
"deleted_at": null,
"expires_at": "2021-12-28T03:41:30.722Z",
"id": "73a5d217bd981e885841b589"
},
"metadata": {},
"object": {},
"package": {
"id": "a44ax285528e6fde7d542192",
"name": "basic",
"slug": "basic",
},
"report": {
"created_at": "2021-09-28T03:41:30.722Z",
"completed_at": null,
"estimated_completion_time": 1,
"id": "e44aa283528e6fde7d542194",
},
"report_url": "https://dashboard.checkr.com/reports/e44aa283528e6fde7d542194",
"uri": "background_checks/bd6b0537212189fd6a4fa2db"
}onInvitationError
onInvitationError is triggered when sending an invitation fails. By default, these errors are displayed at the top of the rendered embed within your application. The NewInvitation embed will return all errors generated by the Checkr API.
const handleOnInvitationError = (response) => { console.log(response) }
const embed = new Checkr.Embeds.NewInvitation({onInvitationError: handleOnInvitationError})
const handleOnInvitationError = (response) => { console.log(response) }
<NewInvitation onInvitationError={handleOnInvitationError}/>{
"errors": {
"invitation": [
"Package not found"
]
}
}The NewInvitation embed provides the following options to customize its default behavior.
Define a custom Candidate ID
You may define a custom candidate ID using the NewInvitation embed to reference Checkr candidates and their background checks. This will create a Checkr candidate with its custom_id set to the specified external candidate ID.
You may use this custom ID to map Checkr candidate IDs to objects in your product. You may also use this custom candidate ID as an argument to the ReportsOverview embed, to show all reports for the candidate.
const embed = new Checkr.Embeds.NewInvitation({ externalCandidateId : 'your-candidate-id' })<NewInvitation externalCandidateId='your-candidate-id' />Add a default candidate email address or phone number
Checkr allows you to set a default value for the NewInvitations embed's email address or phone number. This value will appear in the Embed when launched, and may be modified by your users.
const embed = new Checkr.Embeds.NewInvitation({ defaultEmail: "john@doe.com", defaultPhone: "555-867-5309" })<NewInvitation defaultEmail="john@doe.com" defaultPhone="555-867-5309"/>Hide the Back Button
In certain use cases, the Back button may be unnecessary. You can hide it from the embed by using the following method:
const embed = new Checkr.Embeds.NewInvitation({ hideBackButton: true })<NewInvitation hideBackButton={true}/>Add preset values
Use preset to specify a fixed value for an available input value. Preset inputs (except email and phone) are not displayed on the embed.
Checkr provides 4 preset values for the NewInvitation Embed:
- presetEmail
- presetPhone
- presetNodeCustomId
- presetPackageSlug
- presetWorkLocation
presetWorkLocation can be used to preset two different scenarios
- The full work location
const embed = new Checkr.Embeds.NewInvitation({
  presetEmail: 'john@doe.com',
  presetPhone: '555-867-5309',
  presetNodeCustomId: '1000002',
  presetPackageSlug: 'criminal_drug',
  presetWorkLocation: {country: 'US', state: 'CA', city: 'Los Angeles'}
})<NewInvitation
presetEmail='john@doe.com'
presetPhone='555-867-5309'
presetNodeCustomId='1000002'
presetPackageSlug='criminal_drug'
presetWorkLocation={country: 'US', state: 'CA', city: 'Los Angeles'} />- Only the country
const embed = new Checkr.Embeds.NewInvitation({
  presetEmail: 'john@doe.com',
  presetPhone: '555-867-5309',
  presetNodeCustomId: '1000002',
  presetPackageSlug: 'criminal_drug',
  presetWorkLocation: {country: 'US'}
})<NewInvitation
presetEmail='john@doe.com'
presetPhone='555-867-5309'
presetNodeCustomId='1000002'
presetPackageSlug='criminal_drug'
presetWorkLocation={country: 'US'} />Define labels and placeholders
Checkr allows you to customize the embed’s label and placeholder text for customer input fields.
const embed = new Checkr.Embeds.NewInvitation({
  cityLabel: 'This is a city label',
  cityPlaceholder: 'This is a city placeholder',
  countryLabel: 'This is a country label',
  countryPlaceholder: 'This is a country placeholder',
  emailLabel: 'This is an email label',
  emailPlaceholder: 'This is an email placeholder',
  nodeLabel: 'This is a node label',
  nodePlaceholder: 'This is a node placeholder',
  packageLabel: 'This is a package label',
  packagePlaceholder: 'This is a package placeholder',
  phoneLabel: 'This is a phone label',
  phonePlaceholder: 'This is a phone placeholder'
  stateLabel: 'This is a state label',
  statePlaceholder: 'This is a state placeholder'
})<NewInvitation
cityLabel='This is a city label'
cityPlaceholder='This is a city placeholder'
countryLabel= 'This is a country label'
countryPlaceholder= 'This is a country placeholder'
emailLabel='This is an email label'
emailPlaceholder='This is an email placeholder'
nodeLabel='This is a node label'
nodePlaceholder='This is a node placeholder'
packageLabel='This is a package label'
packagePlaceholder='This is a package placeholder'
phoneLabel='This is a phone label'
phonePlaceholder='This is a phone placeholder'
stateLabel='This is a state label'
statePlaceholder='This is a state placeholder'/>Define filters
You may define filters to limit the packages and nodes displayed to your customers within the Embed.
Filters may be defined based on the parameters included with the package and node resources within the Checkr API.
This example filters on the node’s name, the package’s slug, and also the work location country. The embed will display only nodes with names including central, only packages including basic or premium in their slug, and only Canada or the US as selectable countries.
const embed = new Checkr.Embeds.NewInvitation({
  nodeFilter: allNodes =>
    allNodes.filter(node => node.name.toLowerCase().includes('central')),
  packageFilter: allPackages =>
    allPackages.filter(pkg => ['basic', 'premium'].includes(pkg.slug.toLowerCase())),
  workLocationCountryFilter: allCountries =>
    allCountries.filter(country => ['US', 'CA'].includes(country.code))
})
const nodeFilter = allNodes => allNodes.filter(node => node.name.toLowerCase().includes('central'))
const packageFilter = allPackages => allPackages.filter(pkg => ['basic', 'premium'].includes(pkg.slug.toLowerCase()))
const workLocationCountryFilter = allCountries => allCountries.filter(country => ['US', 'CA'].includes(country.code)
<NewInvitation nodeFilter={nodeFilter} packageFilter={packageFilter} workLocationCountryFilter={workLocationCountryFilter}/>Use standard CSS to customize the look and feel of your embeds.
Adjust the width on the page
By default, Embeds are rendered using the full width of their container div. Adjust the width of the container div on your page to control the width of the embed.
Customize the theme
Embeds include a default theme, and allow users to both customize this default theme or build a custom theme from scratch.
- To customize the default theme, specify the styles you wish to override.
- To build a theme from scratch, use the
useBaselineoption.
The following classes may be targeted by CSS.
| Embed CSS selectors | Loading CSS selectors | ||
|---|---|---|---|
| .btn | .header | .checkr-embeds-loading-container | .loading-bar |
| .btn-loading | .new-invitation | .rect1 | .rect2 |
| .btn-primary | .select-city | .rect3 | .rect4 |
| .btn-submit | .select-country | .rect5 | |
| .btn-success | .select-node | ||
| .form-control | .select-package | ||
| .form-control-typeahead | .select-state | ||
| .form-control-clear-typeahead | .success-view | ||
| .form-group | .typeahead-option-selected | ||
| .form-group-email | .typeahead-option | ||
| .form-group-typeahead | .typeahead-options | ||
| .form-label | .work-location | ||
| .form-label-typeahead |
Edit the default theme
To edit the default theme, specify new values for any of the default CSS selectors listed above.
const styles = {
  '.btn-primary': {
    background: '#0a8080',
  },
  '.header': {
    'font-size': '150%',
    'font-weight': 'bold',
    color: '#F45D48',
  },
  '.form-label': {
    'font-weight': '700',
  },
  '.form-control': {
    background: '#F3FAFB',
    padding: '0.5rem',
  },
  '.form-control:focus, .form-control:focus-visible': {
    'border-color': '#0a8080',
  },
};

const embed = new Checkr.Embeds.NewInvitation({ styles })
Define a custom theme
To define a custom theme from scratch, set useBaseline to true, then specify values for any of the selectors listed below. If values are not set for a selector, the embed will render without styles for that value.
const styles = {
  useBaseline: true,
  '.btn': {
    'border-radius': '0.375rem',
    color: '#ffffff',
  },
  '.btn-primary': {
    'background-color': '#fcd669',
  },
  '.btn-submit': {
    display: 'block',
    width: '100%',
  },
  '.btn-submit:disabled': {
    opacity: 0.7,
  },
  '.form-control': {
    'background-color': '#7795f8',
    border: '0',
    color: '#fff',
    padding: '0.5rem',
    width: 'calc(100% - 1rem)',
  },
  '.form-control::placeholder': {
    color: '#87bbfd',
  },
  '.form-control-container': {
    display: 'inline-block',
    position: 'relative',
    width: '70%',
  },
  '.form-label': {
    color: '#c4f0ff',
    display: 'inline-block',
    padding: '0.5rem 1rem',
    'text-overflow': 'ellipsis',
    'white-space': 'nowrap',
    width: '30%',
  },
  '.form-group': {
    'background-color': '#7795f8',
    'border-radius': '0.375rem',
    'box-shadow':
      '0 6px 9px rgb(50 50 93 / 6%), 0 2px 5px rgb(0 0 0 / 8%), inset 0 1px 0 #829fff',
    'margin-bottom': '1.5rem',
  },
  '.header': {
    display: 'none',
  },
  '.new-invitation': {
    'background-color': '#6772e5',
    'border-radius': '0.375rem',
    padding: '1.8rem 2rem',
  },
  '.success-view': {
    color: '#fff',
  },
  '.typeahead-option-selected': {
    'background-color': '#87bbfd',
    color: '#fff',
  },
  '.typeahead-options': {
    'background-color': '#fff',
    'border-radius': '0.375rem',
  },
};

<NewInvitation styles={styles} />Use the ReportsOverview embed to show the progress and result of a background check for a candidate. The embed displays:
- the name of the package ordered,
- the status of the invitation to the candidate,
- the status of the report's progress and its ETA,
- the result of the report and its completion timestamp, and
- the status of any screenings being run for the given report.
The ReportsOverview embed also provides a link to the candidate in the Checkr Dashboard if the invitation has not yet been completed, and a link to the report once it has been initiated.
The ReportsOverview embed may be added to your page either inline or as a modal. Adding the embed inline will render the embed on your application's page. Adding it as a modal allows you to launch the embed from a button or other feature on your page. The embed requires a Checkr candidate ID or an external candidate ID (the externalCandidateId property) as an argument.
Add the embed inline
Both JavaScript and React may be used to insert the Embed inline in your application. The results shown below are examples of the Embed's default appearance.
const embed = new Checkr.Embeds.ReportsOverview({ externalCandidateId: 'wd-ba1hdmbaav' })<ReportsOverview externalCandidateId='wd-ba1hdmbaav' />Add the embed as a modal
Use JavaScript to launch the Embed as a modal, for example on the click of a button in your application.
const btn = document.getElementById('your-button')

btn.addEventListener('click', event => {
  const embed = new Checkr.Embeds.ReportsOverview({ candidateId: '4c262214ab5daabbd1a6basc' })
  embed.modal()
})The default modal width is 600px on desktops and 100% on mobile devices. Use width property to change the default desktop width.
embed.modal({ width: '700px' })Add SessionToken based on the authentication section above. For example:
const embed = new Checkr.Embeds.ReportsOverview({ sessionTokenPath: '/your-backend/session-tokens', externalCandidateId: 'wd-ba1hdmbaav' })<ReportsOverview sessionTokenPath='/your-backend/checkr-session-tokens' externalCandidateId='wd-ba1hdmbaav' />The ReportsOverview embed will display the following status and results descriptions.
| Status | Description |
|---|---|
| Invitation Sent | The Checkr invitation has been sent. |
| Invitation Expired | The candidate did not complete the Checkr invitation within 7 days of its creation. |
| Invitation Canceled | The invitation was canceled from the Dashboard or API. |
| Report Pending | The report is in progress. |
| Report Suspended | An exception has not been resolved within 7 days (or two attempts), and the report has been placed in Suspended status. |
| Clear | The background check report was completed with a Clear result value. |
| Clear with canceled screenings | A suspended or pending report was force completed, which cancelled some screenings. The completed screenings were all clear. |
| Did Not Pass | No dispute was initiated by the candidate within the required 7 days after a pre-adverse action was initiated by the customer. |
| Report Canceled | The report was cancelled from the Dashboard or API. |
Each Report is made up of a variety of Screenings. Beneath the overall Report status you can see the Screenings listed out, and their respective statuses, as well as their time of completion (if they have completed).
To disable this feature, you can set the parameter of showIndividualScreenings to false (to enable it, you can either omit the parameter or set it to true).
Additionally, these screenings are held in an expandable/collapsible section, to control what the default state there is, you can set expandScreenings to either true or false.
Screenings can have the following statuses:
| Status | Description |
|---|---|
| Pending | This Screening is in progress. |
| Complete | This Screening has finished being run, but no decision has been made on it. |
| Clear | This screening has finished, with a Clear result value. |
| Consider | This screening has finished, with a Consider result value. |
Use standard CSS to customize the look and feel of your embeds.
Adjust the width on the page
By default, Embeds are rendered using the full width of their container div. Adjust the width of the container div on your page to control the width of the embed.
Customize the theme
Embeds include a default theme, and allow users to both customize this default theme or build a custom theme from scratch.
- To customize the default theme, specify the styles you wish to override.
- To build a theme from scratch, use the
useBaselineoption.
The following classes may be targeted by CSS.
| Embed CSS selectors | Loading CSS selectors | ||
|---|---|---|---|
| .reports-overview | .row-content | .checkr-embed-loading-container | .loading-bar |
| .bgc-item | .bgc-status-container | .rect1 | .rect2 |
| .bgc-package-name | .bgc-status-text | .rect3 | .rect4 |
| .bgc-time-description | .bgc-candidate-link | .rect5 | |
| .bgc-dashboard-link | .bgc-container | ||
| .screenings-list | .screening | ||
| .screening-title | .screening-status-badge | ||
| .screening-timestamp |
Edit the default theme
To edit the default theme, specify new values for any of the default CSS selectors listed above.
const styles = {
  '.reports-overview': {
    padding: '5px',
  },
  '.bgc-item': {
    border: 'none',
    'border-radius': '5px',
    'box-shadow': '0px 2px 5px rgb(0 0 0 / 15%)',
  },
  '.bgc-package-name': {
    'font-size': '150%',
    'font-weight': 'bold',
    color: '#F45D48',
  },
  '.bgc-status-container': {
    'background-color': 'white !important',
    color: 'black !important',
    'font-size': '100%',
  },
  '.bgc-dashboard-link': {
    'background-color': '#0a8080',
    padding: '5px 8px 5px 8px',
    'font-size': '14px',
    color: 'white',
    'text-decoration': 'none',
    'border-radius': '3px',
  },
  '.bgc-dashboard-link:hover': {
    opacity: '.9',
    cursor: 'pointer',
  },
};

const embed = new Checkr.Embeds.ReportsOverview({ styles })
Define a custom theme
To define a custom theme from stratch, set useBaseline to true, then specify values for any of the selectors listed below. If values are not set for a selector, the embed will render without styles for that value.
const styles = {
  useBaseline: true,
  '.reports-overview': {
    'border-radius': '0.375rem',
    'background-color': '#6772e5',
    padding: '0.6rem 0.6rem',
  },
  '.bgc-container': {
    padding: 'none',
    border: 'none',
  },
  '.bgc-header-title': {
    color: 'white',
  },
  '.bgc-item .container': {
    'background-color': '#7795f8',
    border: 'none',
    'border-radius': '5px',
    'box-shadow': '0px 2px 5px rgb(0 0 0 / 15%)',
    padding: '15px',
  },
  '.bgc-package-name': {
    'font-size': '130%',
    'font-weight': 'bold',
    color: 'white',
  },
  '.bgc-status-text': {
    'font-size': '100%',
    'font-weight': 500,
    color: 'white',
  },
  '.bgc-time-description': {
    color: '#87bbfd',
  },
  '.bgc-candidate-link': {
    'background-color': '#fcd669',
    padding: '5px 8px 5px 8px',
    'font-size': '14px',
    'text-decoration': 'none',
    'border-radius': '3px',
    color: 'black',
  },
  '.bgc-candidate-link:hover': {
    opacity: '.9',
    cursor: 'pointer',
  },
  '.screening-status-badge': {
    color: 'white',
  },
}

<ReportsOverview styles={styles} />Embeds rely on style and script elements rendered inside the iframe. If your application uses a Content Security Policy, these elements might be blocked by your rules. To avoid this, permit the following sources in your policy. If you are installing the Checkr WebSDK library via CDN, additionally add the CDN source to the script-src header.
| CSP Header | Sources | |
|---|---|---|
| frame-src | https://web-sdk-services.checkr.com | |
| script-src | https://web-sdk-services.checkr.com | https://cdn.jsdelivr.net/npm/@checkr/web-sdk |
If you are using a Checkr staging account, you will need to add sources for Staging as well.
| CSP Header | Sources | |
|---|---|---|
| frame-src | https://web-sdk-services.checkr-staging.com | |
| script-src | https://web-sdk-services.checkr-staging.com | https://cdn.jsdelivr.net/npm/@checkr/web-sdk |
cspNonce
cspNonce can be used to be pass a nonce to all inline style elements rendered by Embeds.
const crypto = require('crypto')
const cspNonce = crypto.randomBytes(16).toString('base64') // '8IBTHwOdqNKAWeKl7plt8g=='

const embed = new Checkr.Embeds.NewInvitation({ cspNonce })
const crypto = require('crypto')
const cspNonce = crypto.randomBytes(16).toString('base64') // '8IBTHwOdqNKAWeKl7plt8g=='
<NewInvitation cspNonce={cspNonce} />API requests made by the Embed appear on the API logs page in the Checkr Dashboard. Candidate invitations and reports can be viewed in the Checkr Dashboard. You can filter by the Checkr candidate or the external candidate ID. Use the enableLogging argument in any embed to see requests made in the browser using Chrome developer tools.
const embed = new Checkr.Embeds.NewInvitation({ enableLogging: true })<NewInvitation enableLogging={true} />All validation errors returned by Checkr APIs calls are shown on the embed’s UI. Use the API logs in the Checkr Dashboard (and other general tactics) to understand which API calls are failing.
The embed also includes an error message specific to the embed:
| Error Message | Reasons |
|---|---|
| This account has not been approved for use | The POST web_sdk/session_tokens request has failed because the account is not credentialed to send Invitations. |
| Contact Checkr to enable Account Hierarchy for your account | The GET /nodes request has failed because the account does not have Account Hierarchy enabled. |
| Could not load Account data | The SessionToken cannot be acquired. API logs will show the POST /web_sdk/session_tokens request failing.The GET /packages or GET /nodes requests have failed due to bad authentication. |
router.post("/session-tokens", async (req, res, next) => {
  const authenticated = authenticateUser();

  if (authenticated) {
    try {
      const response = await axios({
        headers: { "Content-Type": "application/json" },
        method: "POST",
        url: `${apiHost}/web_sdk/session_tokens`,
        auth: {
          username: oAuthAccessToken,
          password: ""
        },
        data: {
          scopes: ["order"]
        }
      });

      res.send(response.data);
    } catch ({ response: { status, data } }) {
      // Send over error data to surface errors from the Checkr API to the Embeds UI
      res.status(status).send(data);
    }
  } else {
    res.sendStatus(401);
  }
});| Examples |
|---|
Examples using fakeMode on Codepen |
| Fullstack example on CodeSandbox |
| A complete reference integration showing OAuth and Embeds on Github |
| Embed patterns app showing various UX patterns to incorporate Embeds |
Additions and updates to the Checkr embeds. Versioning follows the SemVer specification.
version 0.0.54
- New Invitation embed - Add phone number as an optional field for US-based candidates
- Disclosure & Consent embed added
- Add support for
staging
version 0.0.28
CSP security fix for modal styles
Added
sessionTokenRequestHeadersto enable sending headers to an application's backend endpoint. See authentication flow for more details.
version 0.0.26
- Added
sessionTokenRequestHeadersto enable sending headers to an application's backend endpoint. See authentication flow for more details.
version 0.0.3
- Added
enableLoggingoption to enable client side logging. See the troubleshooting section for more details.