Checkr MCP (v1)
The Model Context Protocol (MCP) is an open standard for connecting LLM agents to external tools and data sources. An MCP server exposes a typed catalog of tools that an AI assistant can discover and call — letting the assistant act on real data without bespoke integrations on either side.
Checkr operates two MCP servers, each tuned to a different audience. Pick the one that matches your use case:
Customer MCP
Customers (employers and hiring teams) who want their AI assistant to browse and summarize their own background check reports. Connect from Claude, Cursor, VS Code, or any MCP-compatible client — no credentials to provision, just OAuth Dynamic Client Registration.
Read the Customer MCP guide →Candidate MCP
Embed an LLM agent in your product that retrieves a candidate's own report on their behalf. Provision OAuth Client Credentials in the Checkr Dashboard, then connect Candidate MCP into your agent so candidates can ask "what's the status of my report?" inside your app.
Read the Candidate MCP guide →| Customer MCP | Candidate MCP | |
|---|---|---|
| Who chats with the agent | A Checkr customer (employer, hiring team) | A candidate viewing their own report |
| How identity is established | Customer signs in with their Checkr account | Candidate verifies via email OTP per session |
| How credentials are obtained | At runtime via OAuth Dynamic Client Registration | Provisioned once in the Dashboard, per Checkr account |
| Production endpoint | https://mcp.checkr.com |
https://mcp.checkr.com/candidate-mcp/ |
Both servers redact sensitive personally identifiable information (PII) from every response. Staging endpoints and the per-MCP tool catalogs are documented on each integration's own page.
The Customer MCP server is for Checkr customers who want their AI assistant to browse and summarize their own background check reports. With Customer MCP, you can:
- List your background check reports
- Get details of a specific report
- Get candidate information
Checkr centrally hosts and manages a Streamable HTTP MCP server at:
https://mcp.checkr.com for production data
https://mcp.checkr-staging.com for staging data
The Customer MCP server uses OAuth Dynamic Client Registration so MCP clients can connect according to the MCP specifications — no credentials need to be provisioned ahead of time.
Note: All data returned by the Customer MCP server has sensitive personally identifiable information (PII) redacted to protect candidate privacy.
- Navigate to Settings → Connectors
- Click Add custom connector
- Enter the following:
- Name: Checkr
- Remote MCP server URL: https://mcp.checkr.com
- Click Add
- Next to the new Checkr connector, click Connect
- Follow the on-screen instructions to authenticate into Checkr
- Open the
claude_desktop_config.jsonfile in an editor:- MacOS:
~/Library/Application Support/Claude/claude_desktop_config.json - Windows:
%APPDATA%/Claude/claude_desktop_config.json
- MacOS:
- Add the following:
{ "mcpServers": { "checkr": { "command": "npx", "args": ["-y", "mcp-remote", "https://mcp.checkr.com"] } } } - Save the file
- Restart Claude Desktop
- Run command:
claude mcp add --transport http checkr https://mcp.checkr.com - In Claude Code, run
/mcpto go through the authentication flow
Quick Install

Manual Install
Add the following to your ~/.cursor/mcp.json:
{
  "mcpServers": {
    "checkr": {
      "url": "https://mcp.checkr.com"
    }
  }
}
Navigate to Cursor Settings -> Tools & MCP, and click the Connect button next to the Checkr MCP.
Install from the Command Palette
- Press Cmd+P or Ctrl+P to open the Command Palette
- Type
> mcp, then click > MCP: Add server… when it appears in the list - Select HTTP (HTTP or Server-Sent Events)
- When prompted for URL of the MCP server, enter
https://mcp.checkr.com - When prompted for Server ID, enter
checkr - Activate the server using MCP: List Servers and selecting Checkr, and selecting Start Server
Install from mcp.json
- Open and edit the
mcp.jsonfile:- MacOS:
~/Library/Application Support/Code/User/mcp.json - Windows:
%APPDATA%/Code/User/mcp.json
- MacOS:
- Add the following:
{
  "servers": {
 "checkr": {
   "url": "https://mcp.checkr.com",
   "type": "http"
 }
  },
  "inputs": []
}
The general instructions for adding Customer MCP into other apps are:
- Add a new remote MCP server which uses Streamable HTTP transport
- Point the URL to
https://mcp.checkr.com
If the app only supports local MCP servers:
- Add a new local MCP server which uses Standard I/O (stdio)
- Point the command to
npx -y mcp-remote https://mcp.checkr.com
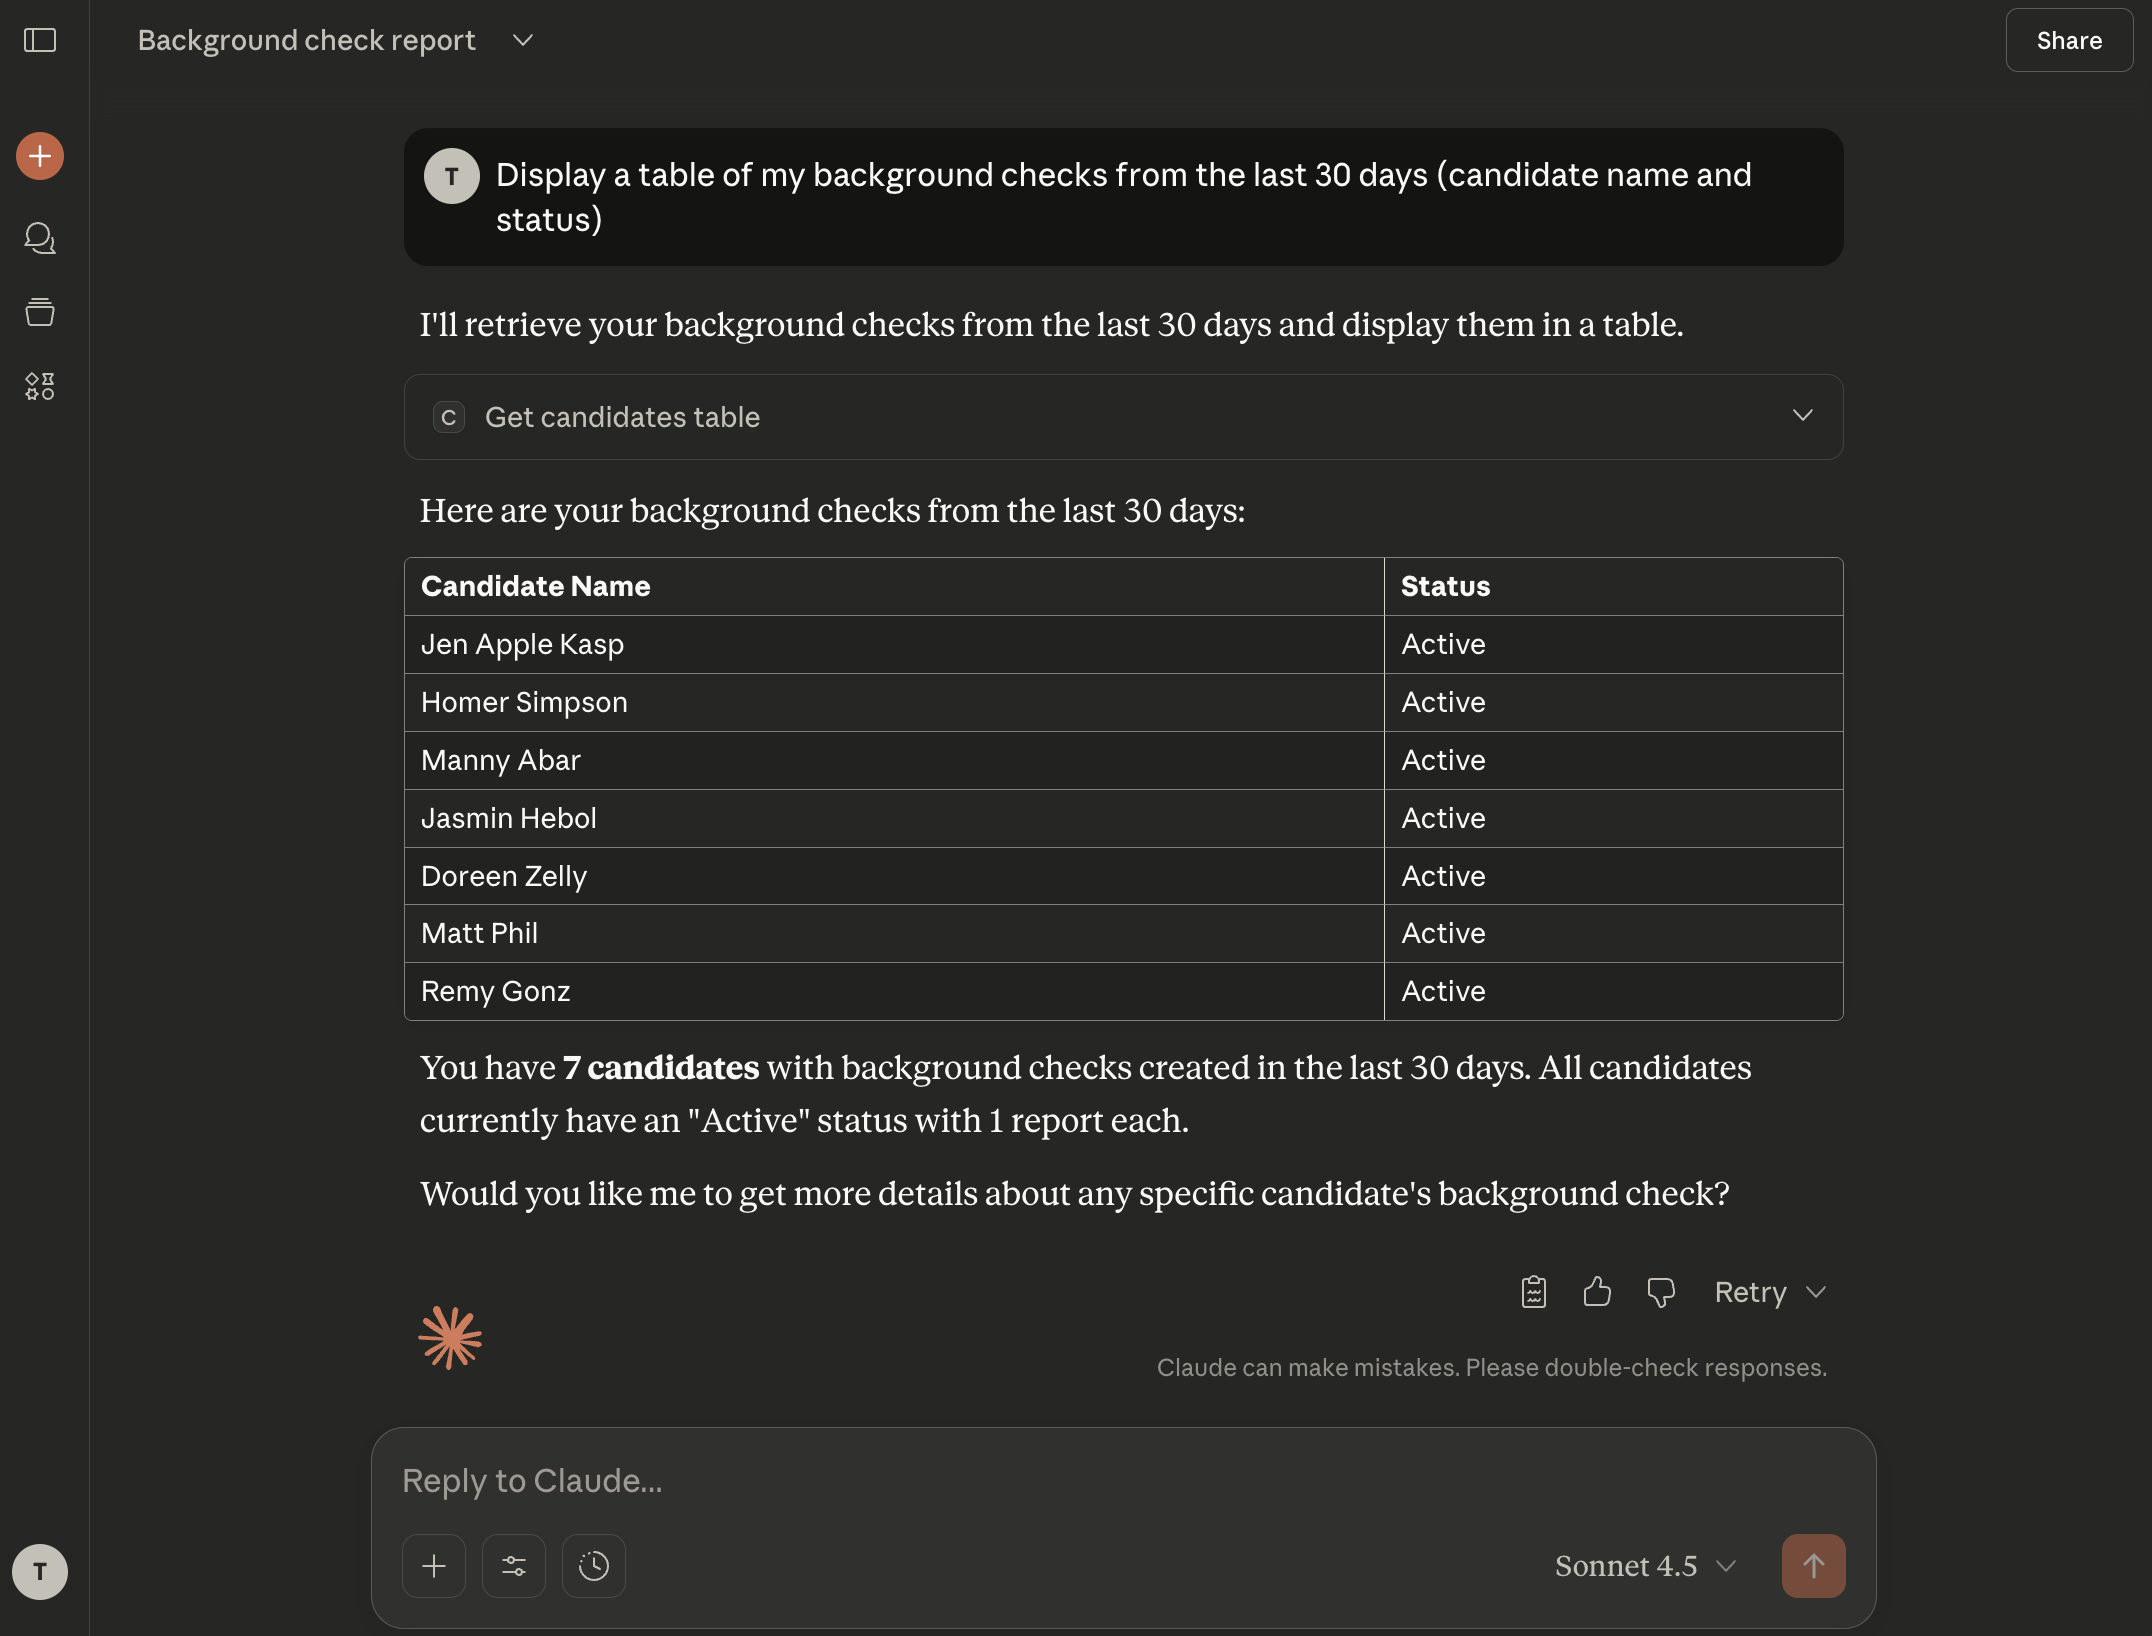
- Display a table of my background checks from the last 30 days (candidate name and status).
- Show me the details of Joe Smith’s report and summarize any findings.
- Find the status of report 6d2ed870c80bf1df1baeef05.
- What is the estimated completion time for Matt Phil's report?
- Create a table of my background checks in csv format. Show candidate name, report id, package, location, start date, completion date, and result.
| Tool | Description |
|---|---|
get_candidate |
Get a candidate by ID |
get_candidates_table |
List candidates with filtering options, formatted for table display |
get_report |
Get a background check report by ID |
The Candidate MCP server is for Checkr accounts that want to embed background check retrieval inside their own LLM agents — so a candidate can chat with the agent and pull their own report. With Candidate MCP, your agent can:
- Verify a candidate's identity via email OTP
- Retrieve the candidate's latest background check report (status, per-screening breakdown, dispute/exception info, candidate portal link)
Candidate: I'd like to check my report.
Agent:     Sure — what email address is associated with your background check?

Candidate: jane@example.com
Agent:     A 6-digit code has been sent to jane@example.com. Please enter it here.

Candidate: 392014
Agent:     Verified. Here's the latest on your report:
           - Overall status: complete
           - Result: clear
           - Screenings: SSN trace (clear), national criminal (clear), MVR (clear)
           - You can view the full report at https://candidate.checkr.com/login
Three MCP tools handle this end-to-end: request_candidate_verification, verify_candidate_otp, get_report. The full reference is in Available Tools below.
Candidate MCP is available in Production and Staging:
| Environment | Endpoint |
|---|---|
| Production | https://mcp.checkr.com/candidate-mcp/ |
| Staging | https://mcp.checkr-staging.com/candidate-mcp/ |
Unlike the Customer MCP, the Candidate MCP uses OAuth 2.0 Client Credentials — your account provisions a Client ID and Client Secret in the Checkr Dashboard once, then your agent exchanges them for short-lived bearer tokens at runtime.
- Create a Checkr account (or use an existing one) in the target environment (Production or Staging).
- Go to Account → Developer Settings and click Generate MCP Credentials.
You will receive:
- Client ID
- Client Secret
- Token Endpoint
These are unique to your Checkr account. Keep them secure — you'll need all three in the next step. The Client Secret is shown only once; copy it immediately.
Establish a secure connection by fetching an OAuth access token. This allows your system to communicate with Checkr's APIs securely.
- Flow: Client Credentials
- Action: Exchange your Client ID and Client Secret for a bearer access token at the Token Endpoint provided during credential provisioning.
- Security: Store credentials in protected environment variables — never hard-code them.
POST <token_endpoint>
Content-Type: application/x-www-form-urlencoded

grant_type=client_credentials&client_id=<ID>&client_secret=<SECRET>
Point your MCP client at the Checkr server using the token from the previous step.
| Setting | Value |
|---|---|
| Endpoint | https://mcp.checkr.com/candidate-mcp/ (Production) or https://mcp.checkr-staging.com/candidate-mcp/ (Staging) |
| Auth | Authorization: Bearer <token> on every request |
| Transport | Streamable HTTP (session-stateful — each connection maintains identity state) |
Once connected, the MCP protocol handles the rest — your LLM automatically discovers the available tools, their parameters, and descriptions directly from the server. No manual tool configuration is needed.
After the initial connection, the server returns an Mcp-Session-Id header. This header must be included on all subsequent requests within the same session — without it, each request creates a new session and any candidate binding is lost. If you're using an agent framework with built-in MCP support (e.g., Claude, OpenAI Agents SDK, LangChain), session persistence is handled automatically. If your agent uses a custom HTTP client to connect to the MCP, ensure it preserves and forwards this header across requests.
Before retrieving report data, your agent must establish which candidate it's acting on behalf of. The candidate proves their identity through an email OTP flow:
- Agent calls
request_candidate_verification(email)→ Checkr emails a 6-digit code to the candidate. - Candidate provides the code to your agent through chat.
- Agent calls
verify_candidate_otp(email, code)→ session is locked to that candidate.
Once a candidate is identified, the session is locked to them for its entire lifetime.
Once a candidate is identified, call get_report() (no parameters needed). Returns the candidate's latest background check report including:
- Overall status and result
- Per-screening breakdown (status, result, type)
- Dispute/exception info if applicable
- Candidate portal link
A redacted-but-realistic shape. Real responses will have fewer or more screenings depending on the package ordered for the candidate:
{
  "id": "8c3f2a91d7b4e5c6f1a92b03",
  "status": "complete",
  "result": "consider",
  "package": "checkr_pro_criminal_mvr",
  "created_at": "2026-04-12T18:42:11Z",
  "completed_at": "2026-04-15T09:18:47Z",
  "candidate_id": "5d1e7c84a39b6f2c0e8d4521",
  "candidate_portal_url": "https://candidate.checkr.com/login",
  "screenings": [
    {
      "type": "ssn_trace",
      "status": "complete",
      "result": "clear",
      "completed_at": "2026-04-12T18:43:02Z"
    },
    {
      "type": "national_criminal_search",
      "status": "complete",
      "result": "consider",
      "completed_at": "2026-04-13T22:11:09Z"
    },
    {
      "type": "motor_vehicle_report",
      "status": "complete",
      "result": "clear",
      "completed_at": "2026-04-14T03:55:21Z"
    }
  ],
  "exceptions": [
    {
      "type": "ssn_invalid_format",
      "status": "resolved",
      "resolved_at": "2026-04-13T01:12:33Z"
    }
  ],
  "disputes": []
}
All sensitive PII (full SSN, full name, DOB, address) is redacted before the response leaves Checkr. The shape above is illustrative — the canonical schema is the live response from the MCP server.
A session begins when your agent connects with a valid bearer token. The server returns an Mcp-Session-Id that identifies the session.
| Rule | Detail |
|---|---|
| Session lifetime | 1 hour |
| Identity binding | Immutable — once account, email, or candidate is set, it cannot change within the session |
| One candidate per session | A session is locked to a single candidate for its entire lifetime |
| OTP send limit | 3 attempts per session |
| OTP verify limit | 3 attempts per session |
| Ownership enforcement | Your agent can only access candidates and reports belonging to your Checkr account |
Send an HTTP DELETE to the MCP endpoint with the Mcp-Session-Id header. The server closes the connection and rejects any further requests on that session ID with 404 Not Found.
If no DELETE is sent, sessions expire automatically after 1 hour.
- The previous session expired or was terminated
- An unrecoverable error occurs (e.g., repeated OTP failures)
Important: Do not reuse sessions across different end users. Each user interaction should start a fresh session to prevent data leakage between candidates.
When interacting with Checkr's MCP tools, your agent should:
- Present all returned data. Don't omit or over-summarize screening results. Candidates need the full picture.
- Never fabricate report data. Only relay what the MCP returns.
- Handle errors clearly. Relay error messages to the user (e.g., "candidate does not belong to your account") without retrying in a loop.
- One candidate per conversation. If the user asks about a different candidate, explain that the current session is locked and a new conversation is needed.
| Tool | Description |
|---|---|
request_candidate_verification |
Send a 6-digit verification code to the candidate's email (OTP flow, step 1) |
verify_candidate_otp |
Verify the candidate's OTP code and lock the session to that candidate (OTP flow, step 2) |
get_report |
Return the identified candidate's latest background check report |
A minimal Python agent — about 80 lines — that authenticates against the Candidate MCP, runs the OTP flow, and retrieves a candidate's report through an OpenAI tool-calling loop.
pip install mcp openai httpx python-dotenv
mcp— official MCP client (handles protocol, sessions, transport)openai— LLM with function callinghttpx— OAuth token exchangepython-dotenv— load credentials from.env
Create a .env next to your script. Each value has a different source:
# From Checkr Dashboard → Account → Developer Settings → Generate MCP Credentials
OAUTH_CLIENT_ID=<your_client_id>
OAUTH_CLIENT_SECRET=<your_client_secret>     # shown once — store in a secrets manager
OAUTH_TOKEN_ENDPOINT=<your_token_endpoint>

# Production: https://mcp.checkr.com/candidate-mcp/
# Staging:    https://mcp.checkr-staging.com/candidate-mcp/
MCP_URL=https://mcp.checkr-staging.com/candidate-mcp/

# Generate at https://platform.openai.com/api-keys — swap for any
# function-calling-capable model (Claude, Gemini, etc.)
OPENAI_API_KEY=<your_openai_key>
OPENAI_BASE_URL=https://api.openai.com/v1
Load the env vars and instantiate the OpenAI client at module scope.
import asyncio
import json
import os

import httpx
from dotenv import load_dotenv
from mcp.client.session import ClientSession
from mcp.client.streamable_http import streamablehttp_client
from openai import OpenAI

load_dotenv()

llm = OpenAI(
    api_key=os.environ["OPENAI_API_KEY"],
    base_url=os.environ.get("OPENAI_BASE_URL"),
)

SYSTEM_PROMPT = (
    "You are a background check assistant. "
    "Use the available tools to verify the candidate's identity "
    "and retrieve their report. Present all data clearly. "
    "Never fabricate information."
)
get_token() runs an OAuth Client Credentials grant against the token endpoint.
def get_token():
    resp = httpx.post(os.environ["OAUTH_TOKEN_ENDPOINT"], data={
        "grant_type": "client_credentials",
        "client_id": os.environ["OAUTH_CLIENT_ID"],
        "client_secret": os.environ["OAUTH_CLIENT_SECRET"],
        "scope": "candidate:read",
    })
    resp.raise_for_status()
    return resp.json()["access_token"]
The MCP server advertises its tools in MCP format; OpenAI's function-calling API expects a slightly different shape. mcp_tools_to_openai() translates between them.
def mcp_tools_to_openai(tools):
    return [{
        "type": "function",
        "function": {
            "name": tool.name,
            "description": tool.description or "",
            "parameters": tool.inputSchema or {"type": "object", "properties": {}},
        },
    } for tool in tools]
run_agent() opens an MCP session, discovers the tools, then loops: read user input → ask the LLM → if it asks for a tool, call MCP and feed the result back → otherwise print the response.
async def run_agent():
    async with streamablehttp_client(
        url=os.environ["MCP_URL"],
        headers={"Authorization": f"Bearer {get_token()}"},
    ) as (read, write, _):
        async with ClientSession(read, write) as session:
            await session.initialize()

            tools_result = await session.list_tools()
            openai_tools = mcp_tools_to_openai(tools_result.tools)
            print(f"Connected. Tools: {[t.name for t in tools_result.tools]}")

            messages = [{"role": "system", "content": SYSTEM_PROMPT}]

            while True:
                user_input = input("\nYou: ").strip()
                if user_input.lower() in ("quit", "exit"):
                    break
                if not user_input:
                    continue
                messages.append({"role": "user", "content": user_input})

                while True:
                    response = llm.chat.completions.create(
                        model="gpt-4o",
                        messages=messages,
                        tools=openai_tools,
                    )
                    choice = response.choices[0]
                    messages.append(choice.message.model_dump(exclude_none=True))

                    if choice.finish_reason != "tool_calls":
                        print(f"\nAgent: {choice.message.content}")
                        break

                    for tool_call in choice.message.tool_calls:
                        tool_name = tool_call.function.name
                        tool_args = json.loads(tool_call.function.arguments)
                        print(f"  [calling {tool_name}({tool_args})]")
                        result = await session.call_tool(tool_name, tool_args)
                        messages.append({
                            "role": "tool",
                            "tool_call_id": tool_call.id,
                            "content": json.dumps(
                                [b.model_dump() for b in result.content],
                                default=str,
                            ),
                        })
Save as agent.py:
Show full Python example (agent.py)
"""Minimal Checkr Candidate MCP agent."""
import asyncio
import json
import os
import httpx
from dotenv import load_dotenv
from mcp.client.session import ClientSession
from mcp.client.streamable_http import streamablehttp_client
from openai import OpenAI
load_dotenv()
llm = OpenAI(
api_key=os.environ["OPENAI_API_KEY"],
base_url=os.environ.get("OPENAI_BASE_URL"),
)
SYSTEM_PROMPT = (
"You are a background check assistant. "
"Use the available tools to verify the candidate's identity "
"and retrieve their report. Present all data clearly. "
"Never fabricate information."
)
def get_token():
resp = httpx.post(os.environ["OAUTH_TOKEN_ENDPOINT"], data={
"grant_type": "client_credentials",
"client_id": os.environ["OAUTH_CLIENT_ID"],
"client_secret": os.environ["OAUTH_CLIENT_SECRET"],
"scope": "candidate:read",
})
resp.raise_for_status()
return resp.json()["access_token"]
def mcp_tools_to_openai(tools):
return [{
"type": "function",
"function": {
"name": tool.name,
"description": tool.description or "",
"parameters": tool.inputSchema or {"type": "object", "properties": {}},
},
} for tool in tools]
async def run_agent():
async with streamablehttp_client(
url=os.environ["MCP_URL"],
headers={"Authorization": f"Bearer {get_token()}"},
) as (read, write, _):
async with ClientSession(read, write) as session:
await session.initialize()
tools_result = await session.list_tools()
openai_tools = mcp_tools_to_openai(tools_result.tools)
print(f"Connected. Tools: {[t.name for t in tools_result.tools]}")
messages = [{"role": "system", "content": SYSTEM_PROMPT}]
while True:
user_input = input("\nYou: ").strip()
if user_input.lower() in ("quit", "exit"):
break
if not user_input:
continue
messages.append({"role": "user", "content": user_input})
while True:
response = llm.chat.completions.create(
model="gpt-4o",
messages=messages,
tools=openai_tools,
)
choice = response.choices[0]
messages.append(choice.message.model_dump(exclude_none=True))
if choice.finish_reason != "tool_calls":
print(f"\nAgent: {choice.message.content}")
break
for tool_call in choice.message.tool_calls:
tool_name = tool_call.function.name
tool_args = json.loads(tool_call.function.arguments)
print(f" [calling {tool_name}({tool_args})]")
result = await session.call_tool(tool_name, tool_args)
messages.append({
"role": "tool",
"tool_call_id": tool_call.id,
"content": json.dumps(
[b.model_dump() for b in result.content],
default=str,
),
})
if __name__ == "__main__":
    asyncio.run(run_agent())
python agent.py
Connected. Tools: ['request_candidate_verification', 'verify_candidate_otp', 'get_report']

You: I need to check my background report
Agent: I can help with that. What email address is associated with your background check?

You: alice@example.com
  [calling request_candidate_verification({"email": "alice@example.com"})]
Agent: A verification code has been sent to your email. Please enter the 6-digit code.

You: 482910
  [calling verify_candidate_otp({"email": "alice@example.com", "code": "482910"})]
  [calling get_report()]
Agent: Here are your background check results...
- Swap the LLM — replace
OpenAI()with any SDK that supports function calling. Themcp_tools_to_openaiconverter would change shape; the rest of the loop is the same. - Cache the token — bearer tokens last 1 hour. In production, cache and refresh shortly before expiry rather than minting a fresh token per request.
- Add a web UI — wrap
run_agent()in a FastAPI/Flask endpoint instead of terminal input. - Node — use the JS/TypeScript
@modelcontextprotocol/sdkwith the sameClient+StreamableHTTPClientTransportpattern.