- You have signed up for a Checkr account either directly with Checkr or through a partner.
- Except for Sign-up & Connect embed: You have implemented Checkr OAuth if you are a partner.
- Load Checkr's Web SDK directly through CDN. This ensures you always have the latest version.
- Add the embed to your frontend code.
- Except for Sign-up & Connect embed: Implement authentication for the embed using a SessionToken.
- Optionally, customize the embed based on your application's needs.
First, Load Checkr's Web SDK using CDN
<script src="https://cdn.jsdelivr.net/npm/@checkr/web-sdk/dist/web-sdk.umd.js"></script>The Examples section below showcases some examples.
For Sign-up & Connect embed no previous authentication is required. In fact, Sign-up & Connect embed will implement most of the Checkr OAuth flow for you. It provides your application with an Oauth Authorization Code to exchange for an OAuth access token, which can be used by your application to make API calls to Checkr on behalf of your customers.
This Access Token must be used to request SessionTokens for authentication using other embeds.
Be aware that the following token exchanges must take place within your own backend application to avoid exposing Access Tokens in your frontend application, which are considered sensitive secrets:
- Exchange of the Oauth Authorization Code for an Access Token
- Exchange of the Access Token for a Session Token (specific to use with embeds.)
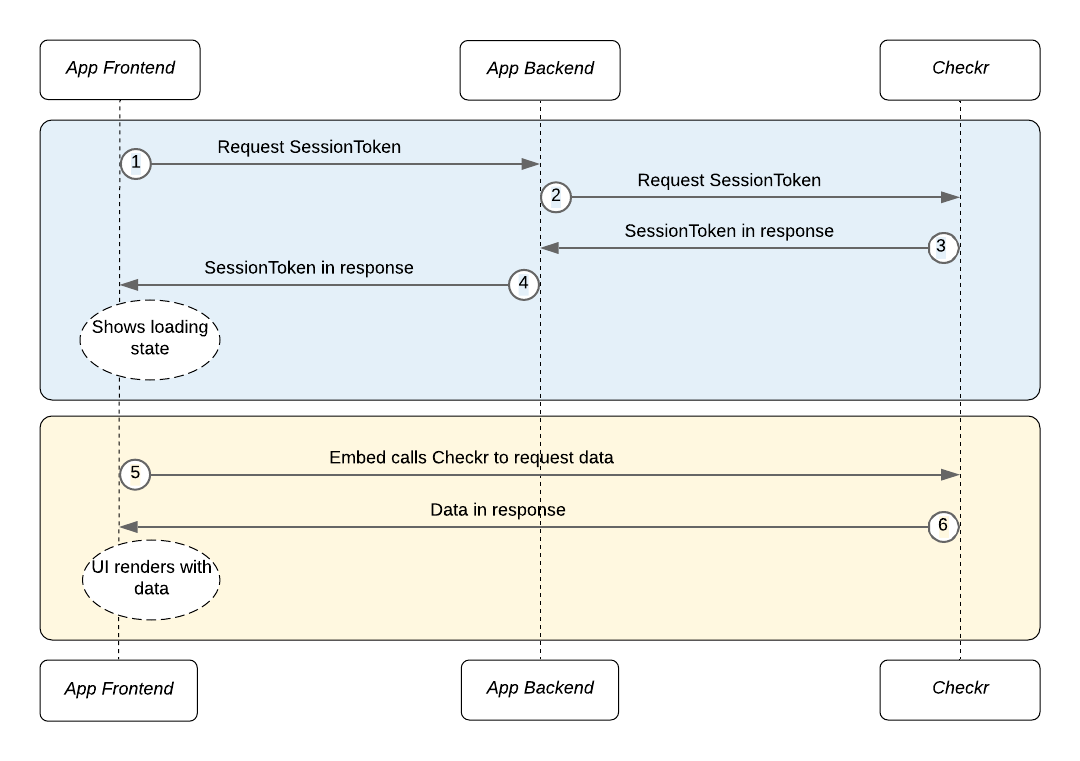
First, the embed authenticates with Checkr.
- The embed sends a request from your application's frontend to your application's backend for a Checkr SessionToken.
- Your application's backend must first authenticate the logged in user using its own mechanisms, and then pass the request to Checkr.
- Checkr sends a SessionToken to your backend in response.
- Your application's backend then passes the SessionToken to the embed running on your application's frontend.
While authentication is processing, the embed displays a loading state in your app. Then, the embed fetches and renders the returned data.
- The embed uses Checkr APIs to request data.
- Checkr APIs return the requested data directly to the embed.
When the requested data is returned, the embed renders within your application.
When an Embed loads for the first time, it sends an HTTP POST request to your backend, requesting a SessionToken. Use the sessionTokenPath property to set your application's backend endpoint to use.
By default, your application's cookies are sent to your backend to help you authenticate the user. To enable authentication via headers (such as bearer tokens), use the sessionTokenRequestHeaders property as shown below.
Note: sessionTokenPath is a path to request the token, not the token itself. You should not be passing the token as a prop directly to the embed.
const embed = new Checkr.Embeds.NewInvitation({ sessionTokenPath: '/your-backend/session-tokens', sessionTokenRequestHeaders: () => ({ Authorization : `Bearer ${token}` })})Note: Do not use a public endpoint for the sessionTokenPath property. Be certain to complete your application's user authentication and authorization before responding to the request.
Run your application's user authentication and authorization rules before requesting Checkr to acquire a SessionToken.
The embed will use the sessionTokenPath property to request a SessionToken from your backend.
const embed = new Checkr.Embeds.NewInvitation({ sessionTokenPath: '/your-backend/session-tokens' })Checkr provides two means to acquire this SessionToken: one for our direct customers, and one for our partner developers.
Customers building directly to the Checkr APIs: Use the API Keys found in the Checkr Dashboard to request SessionTokens.
Partner developers, building partner applications: Use the OAuth Access Token acquired through Checkr OAuth to request SessionTokens. This is a pre-requisite for using Embeds. See the Checkr Partner Guides for more information.
When your application's backend receives the HTTP Post request from the embed, run authentication and authorization rules based on your application logic (for the current user), and then make the following call to Checkr.
Scopes are used to determine what access you are requesting for.
| Scope | Use case |
|---|---|
| order | NewInvitation Embed, ReportsOverview Embed |
| disclosure | Disclosure & Consent Embed |
POST {checkr-api-host}/web_sdk/session_tokens
Checkr API host:
- Staging: https://api.checkr-staging.com/v1
- Production: https://api.checkr.com/v1
Use the following as the request JSON payload:
curl --request POST \
  --url {checkr-api-host}/web_sdk/session_tokens \
  --user your-checkr-oauth-access-token: \
  --header 'Content-Type: application/json' \
  --data '{
	"scopes": ["order"]
}'Checkr will respond with a SessionToken.
{
  "token": "example-session-token"
}Return the JSON response (from above) from the Checkr API back to your frontend.
SessionTokens are short-lived. If they expire, the embed will automatically attempt to renew them by re-executing Steps 2 to 4.
Fake mode lets you play with the Embed without it making any API calls. When fakeMode is enabled in an embed (all embeds support it), the embed would work using canned data.
const embed = new Checkr.Embeds.NewInvitation({ fakeMode: true })If you want to test with a Checkr Staging account, you can pass an additional param to any embed, env: "staging" to run the embeds against Staging. You can omit the env param entirely, or specify env: "production", to use a production account.
Note: Embeds do not support mixed Staging and Production usage on the same page - ensure all concurrently rendered embeds are using the same environment.
const embed = new Checkr.Embeds.SignUpFlow({
  env: 'staging'
  oauthTokenPath: '/your-backend/checkr-staging-oauth-token',
  partner: { id: 'abcdef1', name: 'Enterprise Partner Staging' },
});While Embeds do not rely on Webhooks, you can definitely use it in combination with Embeds to build more advanced features such as workflow automation in your product.